Part of the AWS series:
- Hosting a Static Website on AWS with Hugo and TerraformThis post!
- Getting Started with AWS Container Services: A Beginner's Guide
- Managing Amazon ECR with Terraform: A Step-by-Step Guide
- Reducing Costs and Enhancing Security with Amazon VPC Endpoints
- Lets Learn about AWS SCP
In the era of modern web development, static websites have gained immense popularity due to their speed, simplicity, and cost-effectiveness. If you’re looking to host a static website using Hugo , a popular static site generator, and Terraform , an infrastructure-as-code tool, you’ve come to the right place. In this guide, I will walk you through the process of hosting your static website on AWS (Amazon Web Services) using Hugo and Terraform.
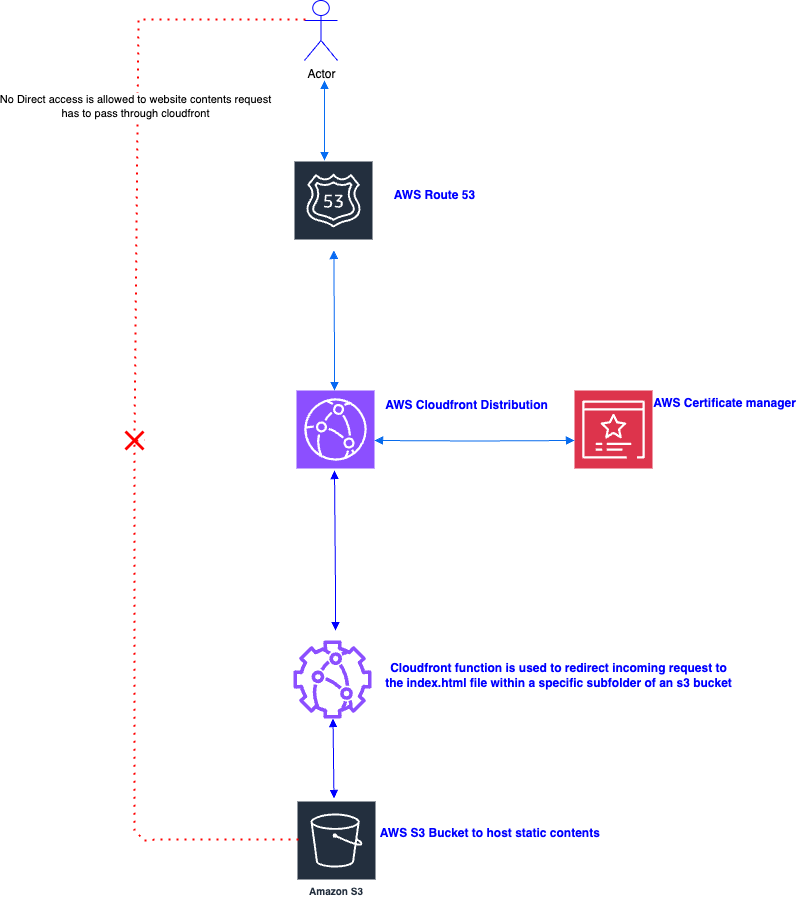
The following diagram shows an overview of how this static website solution works:
Prerequisites
It’s essential to ensure that you have the following prerequisites in place:
Basic understanding of aws services (cloudfront, s3, acm and route53) , Hugo and terraform.
AWS Account: To host your static website on AWS, you’ll need an AWS (Amazon Web Services) account. If you don’t have one, you can sign up for an AWS account on the AWS website
.
Terraform Cloud Account: You’ll need an account on Terraform Cloud. You can sign up for free on the Terraform Cloud website
.
Terraform Installed: Terraform is a powerful infrastructure-as-code tool used to automate the provisioning and management of AWS resources.
Make sure you have Terraform installed on your local machine. You can download it from the official Terraform website
.
Hugo Installed: Hugo is a static site generator that you’ll use to build your website.
Install Hugo on your local machine by following the installation instructions available here
.
Ensuring these prerequisites are in place, you’ll be well-prepared to seamlessly follow my hosting guide. With these vital tools and resources, you’ll have everything you need to automate the deployment of your static website on AWS using Hugo and Terraform.
Step 1: Generate Your Hugo Website
The first step is to select a Hugo theme and generate the website.
Here’s how you can do it:
- Choose a hugo theme
- Hugo offers a variety of themes that you can use to customize the look and feel of your website.
- You can explore, choose, add and configure the theme from the Hugo Themes website
- Generate the Website
- After adding and configuring the Hugo theme, navigate to the folder where you have stored your website content and run the Hugo command to generate your website.
hugo
Now that we've curated the perfect Hugo website with the ideal theme, let's shift our focus to crafting the infrastructure that will host and deliver this masterpiece to the world.
Step 2 : Set Up Terraform Configuration
- Create a new directory for your Terraform project.
- Inside the project directory, create a new file named
main.tfto define your infrastructure. Start by configuring the AWS provider: hcl1provider "aws" { 2 region = "eu-west-1" 3} 4 5# below provider config is used for global resources acm and cloudfront 6 7provider "aws" { 8 alias = "us-east-1" 9 region = "us-east-1" 10}
Step 3: Create an S3 Bucket
-
Create a terraform file
s3.tfto define the s3 infrastructure with below features :- Private bucket
- AES-256 Encryption
- S3 Policy to Allow Access to website only via CloudFront Only
- Upload the contents of the public directory (output of the Hugo build) to your S3 bucket using terraform null resources and local-exec provisioner
-
S3 (Simple Storage Service) is where we’ll store your Hugo-generated static website.
hcl1 # If we set prevent_destroy to false, it permits the removal of the S3 bucket without the necessity to empty its objects, a convenience particularly useful during the development phase. 2 3 4resource "aws_s3_bucket" "website_bucket_name" { 5 bucket = local.domain 6 force_destroy = true 7 lifecycle { 8 prevent_destroy = false 9 } 10 } 11 12 resource "aws_s3_bucket_server_side_encryption_configuration" "website_bucket_name_encryption" { 13 bucket = aws_s3_bucket.website_bucket_name.id 14 15 rule { 16 apply_server_side_encryption_by_default { 17 sse_algorithm = "AES256" 18 } 19 } 20 } 21 22 ## Keeping S3 bucket private 23 24 resource "aws_s3_bucket_public_access_block" "webiste_bucket_access" { 25 bucket = aws_s3_bucket.website_bucket_name.bucket 26 block_public_policy = true 27 restrict_public_buckets = true 28 block_public_acls = true 29 ignore_public_acls = true 30 31 } 32 33 # S3 Policy to Allow Access to website only via CloudFront Only 34 35data "aws_iam_policy_document" "cfn_website_bucket" { 36 statement { 37 actions = ["s3:GetObject"] 38 resources = ["${aws_s3_bucket.website_bucket_name.arn}/*"] 39 principals { 40 type = "Service" 41 identifiers = ["cloudfront.amazonaws.com"] 42 } 43 condition { 44 test = "StringEquals" 45 variable = "AWS:SourceArn" 46 values = [aws_cloudfront_distribution.website_cdn_root[0].arn] 47 } 48 } 49 statement { 50 actions = ["s3:ListBucket"] 51 resources = [aws_s3_bucket.website_bucket_name.arn] 52 principals { 53 type = "Service" 54 identifiers = ["cloudfront.amazonaws.com"] 55 } 56 condition { 57 test = "StringEquals" 58 variable = "AWS:SourceArn" 59 values = [aws_cloudfront_distribution.website_cdn_root[0].arn] 60 } 61 } 62} 63 64 resource "aws_s3_bucket_policy" "website_bucket_policy" { 65 bucket = aws_s3_bucket.website_bucket_name.id 66 policy = data.aws_iam_policy_document.cfn_website_bucket.json 67 } 68 69# Using null resource and local-exec provisioner to push all the files in one time instead of sending one by one 70 71 resource "null_resource" "upload-to-S3" { 72 triggers = { 73 always_run = timestamp() 74 } 75 provisioner "local-exec" { 76 command = "aws s3 sync ${path.module}/pathtohugostaticcontents/public s3://${aws_s3_bucket.website_bucket_name.id}" 77 } 78}
Step 4: Create a CloudFront Distribution
- Create a terraform file
cloudfront.tfto define the cloudfront infrastructure, which is used to set up a content delivery network (CDN) for your web content. Basic Configuration:enabled: Enables the CloudFront distribution.price_class: Sets the price class to “PriceClass_100,” which optimizes for lower cost.aliases: Specifies aliases for the CloudFront distribution, including the primary domain name, “www” subdomain, and the S3 bucket’s regional domain name.provider: CloudFront uses a global network of edge locations we need specify the AWS provider for the cloudFront distribution and set to aws.us-east-1.
Origin Configuration:origin: Defines the origin for the CloudFront distribution.domain_name: Uses theaws_s3_bucket.website_bucket_name.bucket_regional_domain_nameattribute to specify the S3 bucket’s regional domain name.origin_id: Sets the unique ID for the origin.origin_access_control_id: Associates the origin with an AWS CloudFront origin access identity or origin access control, which restricts access to the S3 bucket.Default Cache Behavior: Defines caching behavior for the distribution. Requests for “GET” and “HEAD” methods are cached with specified TTL values. It also sets up HTTPS redirection and compresses responses.Geo Restriction: There are no geographical restrictions in this configuration (restriction_type is set to “none”) but can if you want to restrict depending on your needs.Viewer Certificate: Configures the SSL certificate for secure communication with the CloudFront distribution. It uses an ACM (AWS Certificate Manager) certificate and specifies minimum protocol version settings.aws_cloudfront_origin_access_control: Defines the type of origin to which this OAC applies. In this case, it’s set to “s3,” indicating that this OAC is used for controlling access to an S3 origin.
 1   resource "aws_cloudfront_distribution" "website_cdn_root" {
 2   count = var.domain_name != null ? 1 : 0
 3
 4   enabled     = true
 5   price_class = "PriceClass_100"
 6   aliases     = [var.domain_name, "www.${var.domain_name}", aws_s3_bucket.website_bucket_name.bucket]
 7   provider    = aws.us-east-1
 8
 9   origin {
10     domain_name              = aws_s3_bucket.website_bucket_name.bucket_regional_domain_name
11     origin_id                = var.target_origin_id
12     origin_access_control_id = aws_cloudfront_origin_access_control.default.id
13     }
14
15   default_root_object = "index.html"
16
17   default_cache_behavior {
18     allowed_methods  = ["GET", "HEAD"]
19     cached_methods   = ["GET", "HEAD"]
20     target_origin_id = var.target_origin_id
21     min_ttl          = "0"
22     default_ttl      = "20"
23     max_ttl          = "1200"
24
25     viewer_protocol_policy = "redirect-to-https" # Redirects any HTTP request to HTTPS
26     compress               = true
27
28     forwarded_values {
29       query_string = false
30       cookies {
31         forward = "none"
32       }
33     }
34      function_association {
35       event_type   = "viewer-request"
36       function_arn = aws_cloudfront_function.test.arn
37     }
38   }
39
40   restrictions {
41     geo_restriction {
42       locations = []
43       restriction_type = "none"
44     }
45   }
46
47   viewer_certificate {
48     acm_certificate_arn = aws_acm_certificate.cert[0].arn
49     ssl_support_method  = "sni-only"
50     minimum_protocol_version = "TLSv1.2_2021"
51   }
52
53   lifecycle {
54     ignore_changes = [
55       viewer_certificate,
56     ]
57   }
58   tags = {
59     ManagedBy = "Terraform"
60   }
61   # The distribution depends on the successful validation of an ACM certificate
62   depends_on = [aws_acm_certificate_validation.cert_validation]
63 }
64
65resource "aws_cloudfront_origin_access_control" "default" {
66name                              = "cf OAC"
67description                       = "description OAC"
68origin_access_control_origin_type = "s3"
69signing_behavior                  = "always"
70signing_protocol                  = "sigv4"
71}
Step 5: Create a code snippet for cloudfront function.
- Create a file called
redirect.jsand add the below code snippet. - The following code snippet is used to redirect incoming requests to the “index.html” file within a specific subfolder of an S3 bucket, effectively achieving redirection
 1    function handler(event) {
 2      var request = event.request;
 3      if (request.uri !== "/" && (request.uri.endsWith("/") || request.uri.lastIndexOf(".") < request.uri.lastIndexOf("/"))) {
 4      if (request.uri.endsWith("/")) {
 5         request.uri = request.uri.concat("index.html");
 6      } else {
 7         request.uri = request.uri.concat("/index.html");
 8      }
 9     }
10      return request;
11   }
Step 6: Create a cloudfront function.
- Create a terraform file
cloudfront_function.tfto define the infrastructure for cloudfront functions. - The CloudFront function will be published immediately upon creation. Published functions can be associated with CloudFront distributions.
1
2  resource "aws_cloudfront_function" "test" {
3  name    = var.cf_functions
4  runtime = "cloudfront-js-1.0"
5  comment = "cf function for redirecting the files"
6  publish = true
7  code    = file("${path.module}/function.js")
8   }
9
Step 7: Obtain an ACM Certificate
- To enhance the security of the upcoming static website we’re building, we’ll take the following steps to validate and acquire an SSL/TLS certificate through AWS Certificate Manager (ACM):"
- Create a terraform file
acm.tfto define the acm infrastructure .
 1    resource "aws_acm_certificate" "cert" {
 2     count = var.domain_name != null ? 1 : 0
 3
 4     provider                  = aws.us-east-1
 5     domain_name               = var.domain_name
 6     subject_alternative_names = ["www.${var.domain_name}", "*.${var.domain_name}"]
 7     validation_method         = "DNS"
 8
 9     tags = {
10       ManagedBy = "Terraform"
11     }
12
13     lifecycle {
14       create_before_destroy = true
15     }
16   }
17
18   resource "aws_acm_certificate_validation" "cert_validation" {
19     count = var.domain_name != null ? 1 : 0
20
21     provider                = aws.us-east-1
22     certificate_arn         = aws_acm_certificate.cert[0].arn
23     validation_record_fqdns = [for record in aws_route53_record.cert_dns : record.fqdn]
24   }
Step 8: Create route53 resources
- Create a terraform file
route53.tfto defines the infrastructure with below features- route53 resources to handle DNS validation for an ACM certificate.
- associating a custom domain with an AWS CloudFront distribution.
 1
 2 data "aws_route53_zone" "selected" {
 3 count = var.domain_name != null ? 1 : 0
 4
 5 name = "${local.trimmed_domain}."
 6}
 7
 8resource "aws_route53_record" "cert_dns" {
 9 for_each = {
10   for dvo in aws_acm_certificate.cert[0].domain_validation_options : dvo.domain_name => {
11     name   = dvo.resource_record_name
12     record = dvo.resource_record_value
13     type   = dvo.resource_record_type
14   }
15 }
16
17 allow_overwrite = true
18 name            = each.value.name
19 type            = each.value.type
20 zone_id         = data.aws_route53_zone.selected[0].zone_id
21 records         = [each.value.record]
22 ttl             = 60
23}
24
25resource "aws_route53_record" "domain_name_record" {
26 count = var.domain_name != null ? 1 : 0
27
28 zone_id = data.aws_route53_zone.selected[count.index].zone_id
29 name    = var.sub_domain_name != null ? var.sub_domain_name : var.domain_name
30 type    = "A"
31 alias {
32   name                   = aws_cloudfront_distribution.website_cdn_root[0].domain_name
33   zone_id                = aws_cloudfront_distribution.website_cdn_root[0].hosted_zone_id
34   evaluate_target_health = true
35 }
36}
Step 9: Create terraform variables
- Create a terraform file
variables.tfto defines the input variables - Input variables allow you to parameterize your Terraform configuration, making it more flexible and reusable
 1   variable "bucketName" {
 2     type        = string
 3     description = "Name of the bucket that will also be the website name"
 4   }
 5
 6   variable "index_document" {
 7     type        = string
 8     description = "Suffix for index document"
 9     default     = "index.html"
10   }
11
12   variable "domain_name" {
13     type        = string
14     description = "Domain Name for the s3 website"
15   }
16
17   variable "sub_domain_name" {
18     type        = string
19     description = "Sub Domain Name for the s3 website"
20   }
21
22   variable "target_origin_id" {
23     default     = "cfn_origin_id"
24     type        = string
25     description = "Name of the origin id"
26   }
27
28
29   variable "cf_functions" {
30     default     = "cfn-redirect"
31     type        = string
32     description = "Name of the cloudfront function"
33   }
34
35   variable "origin_access_control" {
36     default     = "cf_oac"
37     type        = string
38     description = "name of cf origin access control"
39   }
Step 10: Create local resources
- crate a terraform file
locals.tfto assign values , create reusable expressions, and simplify your configuration
1  locals {
2     sub_domain_name = var.sub_domain_name != null ? "${var.sub_domain_name}." : ""
3     domain_name     = var.domain_name != null ? var.domain_name : ""
4     domain          = length("${local.sub_domain_name}${local.domain_name}") > 0 ? "${local.sub_domain_name}${local.domain_name}" : var.bucketName
5     source_code_directory = "./tocloud/public"
6     trimmed_domain        = var.domain_name != null ? trimprefix(var.domain_name, "www.") : null
7   }
8
Step 11: “Launch Away! 🚀” Applying Changes with Terraform Cloud
Now that we’ve crafted the perfect website with Hugo and built the essential infrastructure using Terraform, it’s time to launch your stunning static website! 🚀
Initialize Your Configuration
1terraform init-
Create a Workspace- Login into the terraform cloud and create the workspace where all your terraform configuration and assoicated state files will be stored which is useful for managing different environments (e.g., development, staging, production) or projects.
-
Configure Remote Backend- To apply changes using Terraform Cloud, you need to configure your Terraform project to use the remote backend hosted by Terraform Cloud.
- In your local Terraform configuration file (e.g., terraform.tf), configure the backend as follows:
- Replace
your-organization-namewith your Terraform Cloud organization name andyour-workspace-namewith your workspace name. hcl1terraform { 2 required_version = ">=1.5.6" 3 required_providers { 4 aws = { 5 source = "hashicorp/aws" 6 version = ">= 4.9" 7 } 8 null = { 9 source = "hashicorp/null" 10 version = "3.2.1" 11 } 12 } 13 backend "remote" { 14 organization = "your-organization-name" 15 workspaces { 16 name = "your-workspace-name" 17 } 18 }
}
-
Authenticate and Select Workspace- In your terminal, navigate to your Terraform project directory. Run the following command to log in to Terraform Cloud and select the appropriate workspace:
1terraform login- The above command opens a browser window for you to log in with your Terraform Cloud credentials. Once logged in, it associates your local project with the remote workspace.
-
Apply Changes- Now that your project is configured to use Terraform Cloud as the backend, you can apply changes using the terraform apply command, just as you would with a local backend:
1terraform apply- Terraform Cloud will handle the execution of your plan, and you can monitor the progress and logs directly in the Terraform Cloud web interface.
In Closing: Wrapping Up Your AWS Static Website Journey 🚀
To sum it up, the deployment of a static website on AWS using hugo, S3, CloudFront, Route53, and ACM with Terraform offers a robust, scalable, and secure solution. This blog has provided you with a comprehensive step-by-step guide on creating and configuring the essential infrastructure components for hosting your static website.
Remember, this is just the starting point of your AWS adventure, and there's a world of knowledge waiting for you to explore and embrace!